I was trying to setup a web sip client for last one week with Sipml5 and Asterisk-13 on Ubuntu 14.04. But got stuck with lot of sip errors such as 403 forbidden, 603:failed to get local sdp..etc. So tried my Asterisk installation on Centos 6.6 and compiled Asterisk with necessary libraries for webrtc. Steps which i followed are explained below. Hope this may help someone
Here are the components I am using
- Centos 6.6
- Asterisk 13
- sipML5 (Thanks to Dubango Telekom http://www.doubango.org/)
First, you need a working Asterisk 13.1.0 installation. Before doing the Asterisk installation, we have to update our system so that we have everything needed to compile plus the packages we need.
- yum update
- yum install gcc-c++ make gnutls-devel kernel-devel libxml2-devel ncurses-devel subversion doxygen texinfo curl-devel net-snmp-devel neon-devel
- yum install uuid-devel libuuid-devel sqlite-devel sqlite git speex-devel gsm-devel
Next step is to add the libsrtp library support. Do the following from your terminal CLI
[root@asterisk13-build /]# cd /usr/src/
[root@asterisk13-build /]# wget http://srtp.sourceforge.net/srtp-1.4.2.tgz
[root@asterisk13-build /]# tar zxvf srtp-1.4.2.tgz
[root@asterisk13-build /]# cd srtp
[root@asterisk13-build /]# autoconf
[root@asterisk13-build /]# ./configure
[root@asterisk13-build /]# make
[root@asterisk13-build /]# make install
[root@asterisk13-build /]# cp /usr/local/lib/libsrtp.a /lib
[root@asterisk13-build /]# cd ..
Compile another library Jansson – it is available in the CentOS repos, but it’s an old version. Note: Try to set –prefix=/usr/ if compile fails
[root@asterisk13-build /]#cd /usr/src/
[root@asterisk13-build /]# wget http://www.digip.org/jansson/releases/jansson-2.5.tar.gz
[root@asterisk13-build /]# tar zxvf jansson-2.5.tar.gz
[root@asterisk13-build /]# cd jansson-2.5
[root@asterisk13-build /]# ./configure –prefix=/
[root@asterisk13-build /]# make
[root@asterisk13-build /]# make install
[root@asterisk13-build /]# cd ..
Now it’s time for Asterisk itself:
[root@asterisk13-build /]# cd /usr/src/
[root@asterisk13-build /]# wget http://downloads.asterisk.org/pub/telephony/asterisk/asterisk-13-current.tar.gz
[root@asterisk13-build /]# tar –xzvf asterisk-13-current.tar.gz
[root@asterisk13-build /]# cd /usr/src/asterisk-13.1.0 && make clean
[root@asterisk13-build /]# ./configure –with-crypto –with-ssl –with-srtp=/usr/local/lib
[root@asterisk13-build /]# contrib/scripts/get_mp3_source.sh
[root@asterisk13-build /]# make menuselect.makeopts
[root@asterisk13-build /]# menuselect/menuselect –enable format_mp3 –enable res_config_mysql –enable app_mysql –enable app_saycountpl –enable cdr_mysql –enable EXTRA-SOUNDS-EN-GSM
Now time to reconfigure and recompile Asterisk with SRTP etc
[root@asterisk13-build /]# make && make install
Note: WARNING, do not make samples if you have working configurations or use FreePBX etc
[root@asterisk13-build /]# make samples
[root@asterisk13-build /]# sudo make config
[root@asterisk13-build /]# chkconfig asterisk on
Follow the below link to enable secure calling support
https://wiki.asterisk.org/wiki/display/AST/Secure+Calling+Tutorial
First, let’s make a place for our keys.
# mkdir /etc/asterisk/keys
# cd /usr/src/asterisk-13.1.0/contrib/scripts
# /ast_tls_cert -C pbx.mycompany.com -O "My Super Company" -d /etc/asterisk/keys

Next, we generate a client certificate for our SIP device.

# ./ast_tls_cert -m client -c /etc/asterisk/keys/ca.crt -k /etc/asterisk/keys/ca.key -C phone1.mycompany.com -O "My Super Company" -d /etc/asterisk/keys -o malcolm
Now do some stuff on the asterisk conf files => sip.conf, http.conf, rtp.conf, extensions.conf
sip.conf
Edit the /etc/asterisk/sip.conf (or modify Asterisk SIP Settings in FreePBX), add/modify the following settings, in [general]. Notice we add transport ws and wss, these are websocket and websocket secure
udpbindaddr=0.0.0.0:5060
realm=<ip address of the server where asterisk is installed > e.g. 192.168.1.115
transport=udp,ws
Add test accounts
Note: Parameters such as encryption, avpf, icesupport, transport , disallow, allow , dtlsenable, dtlsverify, dtlscertfile, dtlscertfile, dtlscafile, dtlssetup are to be configured same as in the below sample extensions
;extension to use on web client
[6001]
host=dynamic
secret=6001
context=outgoing
type=peer
encryption=yes
avpf=yes
icesupport=yes
transport=ws,wss,udp
directmedia=no
disallow=all
allow=all
dtlsenable=yes
dtlsverify=fingerprint
dtlscertfile=/etc/asterisk/keys/asterisk.pem
dtlscafile=/etc/asterisk/keys/ca.crt
dtlssetup=actpass
;extension to use on web client
[6000]
host=dynamic
secret=6000
context=outgoing
type=peer
encryption=yes
avpf=yes
icesupport=yes
transport=ws,wss,udp
directmedia=no
disallow=all
allow=all
dtlsenable=yes
dtlsverify=fingerprint
dtlscertfile=/etc/asterisk/keys/asterisk.pem
dtlscafile=/etc/asterisk/keys/ca.crt
dtlssetup=actpass
;extension to use on softphones such as twinkle, linphone,ekiga..etc
[6002]
host=dynamic
secret=6002
context=outgoing
type=peer
transport=ws,wss,udp
directmedia=no
disallow=all
allow=all
http.conf
Make the following settings on /etc/asterisk/http.conf file
[general]
enabled=yes
bindaddr=0.0.0.0
bindport=8088
rtp.conf
Make the following settings on /etc/asterisk/rtp.conf file
[general]
rtpstart=10000
rtpend=20000
icesupport=yes
stunaddr=stun.l.google.com:19302
extensions.conf
Add the same context which we applied for the extensions we created on sip.conf
[outgoing]
exten => _X.,1,Dial(SIP/${EXTEN})
;exten => _X.,n,Answer()
exten => _X.,n,Hangup()
Lets setup sipml5
Assuming your web (http) directory is in /var/www
# svn checkout http://sipml5.googlecode.com/svn/trunk/ /var/www/myphone (note, some systems it may be /var/www/html/myphone)
# chown -R asterisk:asterisk /var/www/myphone/ (or /var/www/html/myphone)
Now, head on to your Google Chrome browser and type
http://<yourIP>/myphone/demos/call.htm (e.g. http://192.168.1.115/myphone/call.htm)
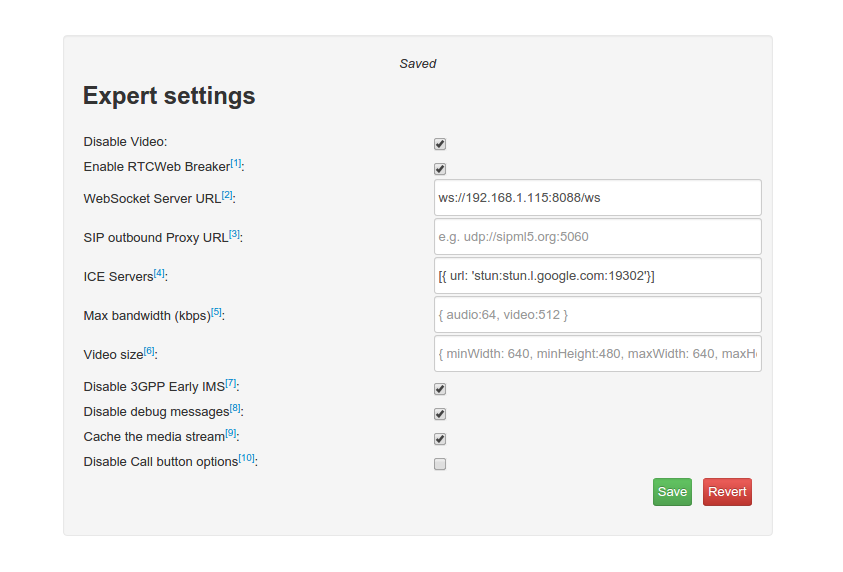
Click on Expert Mode, select to Disable Video.
Enter the information like below except change the part where it says the IP, of course, enter your own IP there
NATting, be sure to have a stun entry like shown above: [{ url: ‘stun:stun.l.google.com:19302’}].
If you’re not NATting, then just put two [] like that and the ICE/STUN will not be used to manage RTP and you call will be connected faster as well. Be sure the stun you use on your server side is the same used on SIPML5 as well.
Websocket URL: ws://192.168.1.115:8088/ws
Click on Save
Go back to the other tab which the webphone is on, enter the SIP extension detailed you created above, or follow and modify per example below
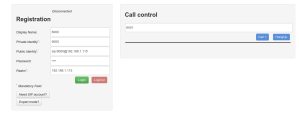
Do the same above steps and configure your other web sip extension say 6001 on other browser. Register both extensions on your asterisk by simply hitting the ‘Login’ button on your screen.
You should be connected to your asterisk server if you have followed above steps.Now you should be able to make call between your test extensions.